Showing posts with label gmail. Show all posts

Friday, March 21, 2014

Redirecting First Class Mail to Gmail


Are you ready to make the switch from FirstClass to Gmail?

by Kathleen Grace and DJ Fikru

Are you concerned that by making the switch from FirstClass to Gmail that you may miss emails that people send to your FirstClass account?  The answer is no.  There are steps that you can take to insure that you get all of your emails. 


How to send your emails from your FirstClass email account to your new Gmail account.
  1. Log into FirstClass
     
  2. Click on Preferences


  1. From the Preferences Window, select Messaging.


  1. On the Mail Rules tab, find the section called Automatically forward.
    Set the fields as follows:
    • Local Mail - Yes
    • Internet Mail - Yes


  1. Change the Method box to Redirect.


  1. In the Forward to box, add your Winchester Gmail address.
    ( First Initial + Last Name + @winchesterps.org )
    For example, if David Ortiz worked here in Winchester, his email address would be dortiz@winchesterps.org.


  1. Finally, click Apply and then OK.


After completing these steps, all new FirstClass emails will be redirected from First Class to Gmail.  Meaning that your emails will exist in both FirstClass and in Gmail.  

Before you start using your new Gmail account, please see the blog entry Making the Move to Gmail from FirstClass.  Here you will find important information to insure that your emails get delivered correctly.

Wednesday, March 12, 2014

Moving Your FirstClass Contacts to Gmail

By following the steps below, you will be able to move your contacts from FirstClass to Gmail.

Export Contacts from FirstClass


  1. Click File -> Export (see right)  
  2. In First Class, choose Contacts then File and Export


  3. This will open the Export Contacts window box right.
     
  4. Under Export these items select All contacts
     
  5. UndeContacts export format choose
    For use with Outlook (.csv)
  6. In FirstClass, select your Contacts folder
    Export all contacts for use with Outlook (.csv)


  7. Click the OK button
     
  8. This will bring up the Transfer window (right).
     
  9. To make your contacts easier to find, it is suggested that you save your file on your Desktop.
     
  10. Name your file Contacts and be sure that the file is saving as Comma Separated Values (.csv).


  11. The File Transfer Status window will appear.
    When your contacts have been transferred, you will be notified that the File Transfer is complete.
     
  12. Click on Open Folder and verify that the file named Contacts.csv exists.


Import Contacts to Gmail


  1. Log into your Gmail account
     
  2. Select Contacts by clicking on the triangle next to Mail.
     
  3. Select Import Contacts... from the left hand navigation (see below).  If you do not see this option, select More to show more options.
     

  4. The Import contacts window will appear.
     
  5. Choose the Contact.csv file that you saved on your desktop and click Import (see below).

  6. After the contacts are imported, you will notice a contact list called Imported date in the left hand column (see below).
     
  7. To rename this contact list, click on More -> Rename group
     
  8. Change the name from Imported date to First Class Contacts


Finally, it is suggested that you check your newly imported contacts to make sure that FirstClass exported all of the contacts that you wished.  

Information for this blog came from: https://sites.google.com/a/svrsu.org/support/firstclass-users

Friday, March 7, 2014

Gmail - Creating a Contact List

As you begin using Gmail, you most likely will want to create mailing lists of groups of people whom you contact together frequently.  For example, a math teacher at the high school will probably want to contact the other teachers in her department on a regular basis.  


Creating mailing lists is easy in Gmail.
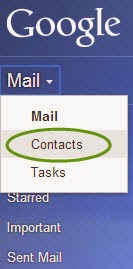
To access your Gmail contacts, click on the 
next to the word Mail in Gmail (right) and click Contacts.  

This will bring you to the Contact screen (below). 


Using links in left hand navigation bar, will enable you to:

  • Add New Contacts
  • See a listing of your current contacts (My Contacts)
  • See a list of contacts that you have Starred
  • See a listing of all of your current contact lists and the number of contacts who are part of that list
  • See a list of your most contacted contacts, other contacts, directory of WPS employees
  • Create New Groups
  • Import Contacts from another email system.
To create a new Contact List
with a list of all members of perhaps the Math Department, I would click New Group (see green circle above). 

This will bring up the New Group window where I will type in the name of my new group - Math Department (see right).

The new contact list will now appear in my left hand navigation bar. Notice that the group does not have a number next to it.  This is because I have not added any members to the group.

If I click on the contact list, my (currently empty) contact list will appear on my page.


Adding Contacts to my Group

Contacts can be added to my group in a few of ways.  

First, I can add a contact to the list by choosing the group and then clicking on the Add Members icon. Here I would type in the name of my contact(s) and click Add (see right).
Care should be taken to be sure that the email address that you add here is correct.


A second way of adding a contact is to search for the person in the search bar at the top of the page (see right).

For example, suppose that I wanted to search for the math director, Tom Haver.  I could type Haver in the search bar and click enter.  Then all people with the name Haver would appear. 

Click on the box next to Tom Haver's name.

Then click on the Add to Groups icon (see right).  This will give me a listing of all the groups that I have and allow me to pick which groups for which Tom should belong.  

After I have chosen the groups, remember to hit Apply.

After Tom is added to the group, I will receive the message below.   Notice I have the opportunity to Undo if I have made a mistake.


A third way to add contacts is to add them from My contacts or from the Directory.  Notice these groups in the left hand navigation bar (see right).

Both of these lists will give me a number of contacts from which I can select the boxes next to all of the names which I want to add to my new group.

For example, Gail Texin and Gayle Simeone both belong to the Math department.  I can click both of their names, click the Add to Group button, check Math Department and then click apply.  I have added both teachers in one step.


How do I use the Groups that I have created?

Once I have created the groups, I can now type in the name of the group instead of a person's name.  All of the members of the group will now be added to my email.


Thursday, February 27, 2014

Making the Move to Gmail from First Class

Are you primarily using your new Gmail account rather than your old First Class email? 


If your answer is yes, there are a few things for which you must consider.

  1. Winchester Public Schools is not moving to First Class until this summer. Therefore, many teachers / staff / administrators will continue using First Class until then.

    In order to insure that your emails are received by others in the district, please continue to send emails using the k12.ma.us email address.


    If you know that the email recipient is using Gmail, go ahead and use the winchesterps.org email address.  But if there is any question as to which email address to use, then use the k12.ma.us address.
      
  2. After you move to Gmail, you will need to continue checking First Class emails that are sent to conferences.

    For example, at the High School, the principal will share important information with the staff in the High School folder.

    Please remember to log into First Class to check your conference folders.
      
  3. Sending emails from your gmail account to your own k12.ma.us email address will force a NDN error (see below).

  4. Don't panic.  Only you will receive this error message and you will also receive the email that you sent. 

    To prevent receiving these errors,  simply do not send emails to your k12.ma.us account.  This should not be a problem because Gmail does an excellent job organizing your emails and you will find that your sent emails will be easy to find.


Tuesday, February 18, 2014

Setting up your Gmail Account -- Inbox Settings

The way that you view and experience Gmail is individualized through the use of different settings.  Because we are all different and may prefer the way that we view our mail, Gmail offers different display settings for your inbox.  

Nothing is set in stone.
If you choose a setting and later decide it is not working for you.  No worries.  Go back to your Gmail Inbox settings and try something else.  

Google Inbox Settings
To access your Inbox settings, click on the Gear in the top right of your Gmail page (see right) and then select Settings from the dropdown box.

At the top of the Settings page you will see the menu bar below.  Select Inbox from the menu bar.


The Inbox Menu will look like the image below.


Inbox Types
The first and most important setting that you will encounter is the Inbox Type.  Here you have 5 choices.  You may select Default, Important First, Unread first, Starred first, Priority Inbox.  You access the choices by clicking on the small arrow in the right side of the box.


Default Inbox

The default inbox allows you to separate your email into different categories. There are 5 default categories.  You may choose all of the categories, or a combination of any of them.


What do the different categories mean?

Primary Person to Person communications and conversations that don't appear in other tabs.
Social Messages from social networks, media sharing sites, online dating services, and other social web sites.
Promotions Deals, offers, and other marketing emails.
Updates Personal, auto-generated updates including confirmations, receipts, bills, and statements
Forums Messages from online groups, discussion boards, and mailing lists.

Note:
As we move to Gmail, the Forums area will become something like conferences in First Class.  Any group that you belong to (e.g., High School English, High School, WAG 10th grade, News), will be separated out into the Forum section.

Important First
Important FirstBoth you and the sender of an email may flag the message as important by clicking on the important icon (see right).
By choosing Important First, all emails that have been flagged as important will be shown first.  All other emails will be put into a section called Everything Else.

Note: 
Because others can mark their emails as important, you may find that many emails are marked as important that in your mind are not important.  This can lead to many emails in the first section that you may not want there.  You can remove these emails from the important section by clicking on the important icon shown above.


Unread First

With Unread First, all of your unread emails are shown at the top of your screen.  This allows you to quickly see any new emails that might need your attention. 

Note:
You may keep an email in the top section after it has been read by marking it as unread.  In this way, you may keep an email that is older in the top section because it needs your attention.


Starred First

Starred First is very similar to Important first except only you can Star an email.  In this way, you can decide which emails are important or need further attention. 

An email is starred by clicking on the star next to the Sender name in the inbox.  
   

Priority Inbox

The Priority Inbox allows you the most customization choices available for your inbox.  

The Inbox Section allows you four sections in which you may decide what types of emails to show. 

In the image right, the first emails that will be shown are Important and Unread.  However, by clicking the Options link to the right of this choice, you are given additional choices for customization.  These choices include many of the options described above, the number of emails to show in this section, whether or not to show section if it is empty, and the option to remove the section.  This is true for all of the other sections as well.


As you can see, there are many options for configuring your inbox.  No one way is the right way.  It's a matter of personal preference.  Take some time and try a few different configurations and find out which one is right for you.

Finally, don't forget to click on the Save Changes button at the bottom of the page or none of these changes will take affect.


Monday, February 10, 2014

Accessing your Gmail Account is as Easy as 1-2-3.


Now that you have received your new Gmail account, you may be a little confused about how you get to Gmail the next time you want to login.  It is not difficult if you follow the steps below.

Step 1.  Open your browser.
You may access your Gmail using any browser that you choose: Internet Explorer, Firefox, or Chrome.  The choice is up to you, but I recommend Chrome because it, too, is a Google product.

Start your browser and open your Google search screen (i.e., surf to Google.com).  

Step 2. Sign In.

If you have not logged in already, you will see the screen below.


In the the top right of the screen, you will see a blue Sign In button (see above in red box).  Click on the Sign In button.

If you are already signed in, you will not see the Sign In box.  Instead, you will see your username in place of the Sign in Button.  Continue to Step 3.

If you have logged into Gmail on the computer before, you should see a screen similar to the one below.  In this case, I would click on my name to log into my school account. 


If the account listed in this screen is not my account, I would click on Add Account and follow the steps below.

If you have never logged in using your Google account on the computer, you will receive the screen below. Type in your username and password and click Sign In.


Step 3.  Go to Gmail.
When you are logged in, the sign in button on the Google screen changes to your Gmail account address (see red box below).


Accessing Gmail once you are logged in can be done by clicking on the word Mail in the top right of the Google search screen.  

You may also access Gmail by clicking on the Google bar icon  .  
This icon, located in the top right corner of your screen allows you to easily switch between many different Google products with just one click.  For example, when I click the Google bar icon, I'm given the screen below.  Here I can access google search, Gmail, Google Drive, Google Calendar, Google Sites, Google Groups, and my Contacts.  


Click on the Google Mail Icon to access your email account.
As you can see, getting your Gmail is as easy as 1-2-3, no matter where you are and no matter what computer your are using.

Thursday, February 6, 2014

Need Help in the move from FirstClass to Gmail?

During Tuesday's training session with Andy Marcinek, he mentioned the web site that he and his group created to answer many of the questions that people in his district had with the move from First Class to Gmail.  

The web site is GDRSD EdTech Commons and can be found by googling GDRSD. To make it easy, you can also click here - GDRSD EdTech Commons 

Wednesday, February 5, 2014

Setting up your Gmail Account - General Settings

Now that you have your new Gmail account, you may want to personalize your Gmail desktop.  This is done via Gmail settings which you access by clicking on the gear icon (right).

Select the Settings option.

At the top of the Settings page is the navigation menu below:


By clicking on the General tab, you can modify the following settings:

Text Style.  You can decide the font, text size, and color of your outgoing messages by changing the Default text style.


Desktop Notifications. Do you want people to be able to instant message you when you are in google?  If you do, make sure that Chat notifications is set to on.  Would you like a sound to indicate that you have a new message?  These settings are established by the buttons labeled Desktop Notifications.


Profile Picture.  I think it is a great idea to set your profile picture.  This is your professional account and it is helpful for the people whom you will be communicating with from this account (e.g., teachers, admin, parents, students).  You have the choice of making this image available to everyone, or only those people with whom you chat.


Email Signature.  Because this is your professional account, you should include a professional signature at the bottom of your email message.  Include your title, department, school, and contact information. As a teacher, you might consider including a link to your class web pages, blog, or twitter page.


Vacation responder.  If you are not going to be available whether through vacation, illness, or perhaps family leave, this is a great place to let people know that you will have limited availability to your email and whom else they may want to contact while you are away.


The above is just a summary of some of the settings under the general tab. When you access the settings, you will see the other settings that you can modify. You will also notice that Google does a great job of providing information regarding the purpose of the additional settings where you can learn more about them.